From Selfie to Superstar: Building a Hollywood-Style AI Movie Trailer in Under an Hour
Learn how to build a cinematic AI movie trailer in Pictor in under an hour — from ideation and A-roll/B-roll framing to survey tokens, blend modes, and the Live Simulator that lets you test without hardware.
Eve Martin
It’s 11:00 PM. You’ve got a massive RFP due tomorrow morning for a global brand activation. They want something “revolutionary.” They want “AI.” And they definitely want something that feels like a Super Bowl commercial.
In the old days, this meant a frantic run to the car to grab your photo booth, a long night of troubleshooting, and a lot of coffee. But the landscape has shifted. Today, the distance between a wild idea and a polished, Hollywood-style trailer is less than sixty minutes.
At Pictor, we’re seeing a new breed of operators who aren’t just taking photos; they’re acting as creative directors. They use the platform to turn a single guest selfie into a cinematic experience that looks like it cost six figures to produce. With the help of our Weekly Show & Tell guests, we brainstormed the “Born Impossible” workflow—a high-octane, spy-thriller experience set in the rain-slicked streets of Amsterdam.
Here’s exactly how you can build it.
The Ideation Phase: Turning Gobbledygook into Gold
Every great cinematic experience starts with a vision, but let’s be honest: sometimes your brain is moving faster than your fingers can type. When I’m in the “mad scientist” phase of a project, I don’t start by writing code or even formal prompts. I use a tool called Superwhisper to brain-dump my ideas.
I’ll talk to the AI like a friend: “Hey, I want a Mission Impossible vibe, but sillier. Let’s call it ‘Born Impossible.’ We need Amsterdam at night, teal and orange lighting, wet streets, and a starring moment for the guest.”
From there, I feed that raw stream of consciousness into Perplexity AI to refine the aesthetic. This “second brain” approach takes the creative pressure off. Instead of staring at a blinking cursor, you’re iterating on a vision. Within five minutes, you have a cohesive setting, a color palette, and a narrative arc.
Want to build projects like this live with the Pictor team?
Join our weekly Show & Tell — free workshops where we brainstorm, build, and ship creative activations together.
Subscribe to the Show & Tell CalendarUnderstanding the A-Roll and B-Roll Framework
To build a movie trailer that actually feels like a trailer, you have to think like a filmmaker. This is where the concepts of A-roll and B-roll come in—a distinction that separates the pros from the amateurs in the event technology space.
- A-Roll: This is the primary footage. In our world, this is the guest. It’s the AI-transformed video where the attendee becomes the secret agent staring down the camera.
- B-Roll: This is the supplemental footage. It’s the title cards, the “Starring” sequences, and the giant explosions at the end.
The secret to a high-end output is using B-roll to do the heavy lifting. By pre-generating cinematic B-roll, you create a framework where the guest’s AI transformation (the A-roll) feels like the centerpiece of a larger production. In addition to creating an amazing output, you also reduce your compute token spends by three because you’re only using generative AI for one clip per session, vs four.

Inclusive Design: Why Flexibility in Prompting Matters
Before we dive into the build, there’s an important lesson we’ve learned from analyzing over 10,000 AI activations on the Pictor platform. When we first launched our AI features, the most requested “fix” was adding rigid gender selections.
However, the data tells a different story. Currently, over 10% of users choose non-binary or gender-neutral options when interacting with AI prompts. In a global event landscape, flexibility isn’t just a “nice-to-have” feature; it’s a business requirement. When you build your prompts in Pictor’s Custom Prompt Editor, you’re designing for everyone. Staying inclusive ensures that your activation is a hit with the entire room, not just a segment of it.


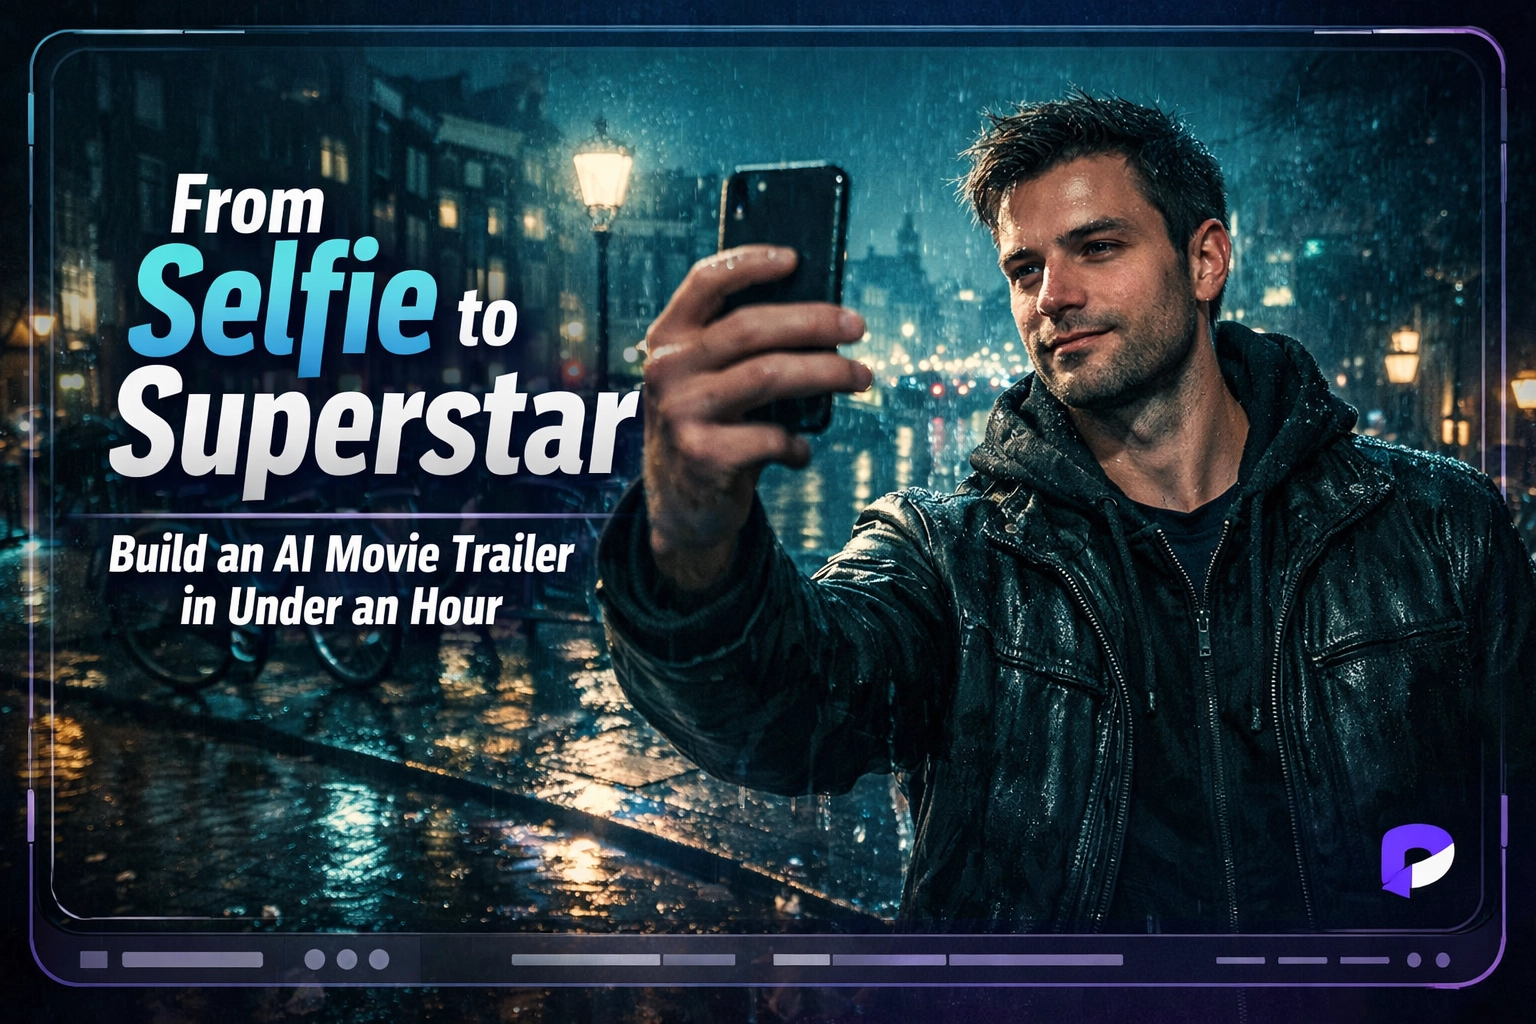
Before: The original selfie
After: The AI-generated Born Impossible spy trailer
The Step-by-Step Build: From Prompt to Premiere
Now, let’s get into the mechanics. We’re aiming for a 15-second masterpiece.
One thing that makes this doable (and honestly fun) is Pictor’s template builder that’s truly WYSIWYG—what you see is what you get. You’re not guessing how a multi-clip trailer will feel once it’s “compiled.” You’re building the actual experience your guest will tap through, in the same order, with the same timing on a visual timeline editor.
1. Setting the Scene in the Custom Prompt Editor
In Pictor, you’ll start by creating your custom prompts. For “Born Impossible,” we want a “Modern spy thriller, Amsterdam at night, wet streets, cool blue and teal lighting.”
Pro Tip (Likeness in AI Video): Pictor’s AI is built to preserve real guest features (especially in messy live-event lighting), but your prompt still matters. To keep likeness rock-solid, avoid writing prompts that imply a bunch of scene cuts (jumping locations, switching angles, “then we cut to…”). Keep the face in it like a single continuous shot to prevent drift.
The “Selfie of Myself” Hack: If you’re using a reference image, explicitly say “a selfie of myself” in the prompt. It’s a small phrasing trick, but it nudges the model to prioritize the provided face as the anchor of the shot instead of “inventing” a new person.
Pro Tip: Always start your renders in low resolution. It saves tokens during the testing phase, and honestly, sometimes the low-res output may yield an output you like more. Once you’ve nailed the look, you can test scaling up to medium and high-def for the live event.
Try It Yourself: The Born Impossible Master Prompt
We’re sharing the prompt framework we used to build this experience. Just paste it into your favorite AI, fill in the [BRACKETS] with your own details, and hit enter. You’ll have four production-ready clip prompts in seconds.
Step 1: Generate Your 4 Clip Prompts
Copy the prompt below and paste it into Perplexity, Claude, ChatGPT, Gemini, or the LLM of your choice. Replace each [BRACKET] with your own value—we’ve pre-filled ours as an example—and the AI will return four ready-to-use clip prompts.
Click to expand the Mad Libs Prompt ↓
I’m creating a 4-clip video composite for a movie.

Movie title: [MOVIE_TITLE]
Genre / type of movie: [MOVIE_TYPE]
Overall aesthetic / visual style: [AESTHETIC_STYLE]
City / location: [SETTING_CITY]
Specific setting details: [SETTING_DETAILS]
Time of day and weather: [TIME_AND_WEATHER]
Color palette: [COLOR_PALETTE]
Title / text style: [TEXT_STYLE]
Hero description: [HERO_DESCRIPTION]
Hero face reference (selfie, etc.): [HERO_FACE_REF]

Please create 4 short, self-contained AI video prompts, one for each clip:

1. Opening title clip that shows only the movie title [MOVIE_TITLE].
2. Second clip that shows only the word “STARRING”.
3. Third clip: a single, continuous hero shot of [HERO_DESCRIPTION], with their face and eyes locked on the camera the whole time, preserving the likeness from [HERO_FACE_REF].
4. Closing clip that shows a dramatic finale and the text “COMING SOON”.

For each of the 4 clips, output two very short lines:

Setting & Aesthetic: 1 short sentence using the info above.
Video Direction: 1 short sentence describing camera, framing, and motion/action.

Write everything as direct prompts to a text-to-video model, keep it concise, and do not reference the other clips.
Step 2: Build It in Pictor
Once you have your four clip prompts, here’s how to bring them to life:
- Generate clips 1, 2, and 4 using any text-to-video tool (Pictor, Runway, Kling, etc.). Iterate until they match your vision, then save them to your desktop.
- Refine clip 3 (the hero shot) separately. This is the AI capture that uses the guest’s selfie, so dial in the likeness until it feels right. Save this prompt to your Custom Prompt Library in Pictor.
- Build your template on a 20-second timeline in the Pictor template editor. Drop clips 1, 2, and 4 onto the timeline as pre-rendered media, and set clip 3 as the live AI Capture stage.
- Add Survey Tokens (like the guest’s name) to overlay on the “Starring” card for personalization.
- Layer in transitions using Lighten blend mode overlays (camera flashes, light leaks) between clips.
- Test in the Live Simulator to preview the full guest flow, tighten timing, and validate the experience before your event.
2. Crafting the B-Roll
You need three main pieces of B-roll:
- The Title: “Born Impossible” appearing over a foggy canal.
- The Starring Slide: A high-intensity graphic that simply says “Starring.”
- The Outro: A dramatic explosion or a “Coming to a Theater Near You” tag.
You can generate these directly in Pictor or pull them from stock libraries like Adobe Stock.
3. Personalizing with Survey Tokens
This is where the magic happens. You don’t want the screen to say “Guest Name”—you want it to say “Starring: THE ACTUAL GUEST’S NAME.” By adding a quick survey question (“What is your name?”) to your flow stage, you can use Survey Tokens to automatically populate the guest’s name over the “Starring” B-roll. It’s a small detail that makes the guest feel like a genuine celebrity.
And if you want to turn it into instant party time for guests, pair that “Starring” moment with a Virtual Booth QR. They scan, enter their name, snap a selfie, and the trailer immediately kicks back a personalized “Starring” output. It’s that fast little hit of delight that makes people pull friends into frame and run it again.
4. Assembling the Timeline
In the Pictor template editor, your timeline will look something like this:
- 0:00–0:05: B-roll Title Sequence
- 0:05–0:10: B-roll Starring slide with the Guest Name token overlay.
- 0:10–0:15: The A-roll (the guest’s AI-transformed action shot).
- 0:15–0:20: The B-roll Outro.

The Secret Sauce: Blend Modes and Transitions
If you just cut from one clip to another, it can feel like a PowerPoint presentation. To give it that Hollywood polish, you can power up with transitions.
Here’s the “old-school” trick that still works: use a quick overlay clip (black background with white text, flashes, dust, or a light-leak style hit) as a transition layer between scenes. Then set that overlay to Lighten inside Pictor.
The easiest real-time example is the “paparazzi” effect: a black video with aggressive white camera flashes. Set the blend mode to Lighten, and the black disappears instantly—so only the flashes are visible on top of your trailer. No complex masking. No keying. Just drop it in, set the blend mode, and you’ve got high-energy motion that makes the whole thing feel more expensive.
Because Lighten keeps the brighter pixels, the black background effectively disappears—leaving only the white flashes and text as a punchy wipe that hides your cut. It’s simple, it’s controllable, and it looks like you planned it in an edit suite instead of a booth template editor.
Pictor is the only software in the industry that includes Photoshop-style Blend Modes directly in the editor, which means you can build these cinematic fades and flash-cuts without exporting to another tool.
Business Use Cases: Why This Wins RFPs
Why go through all this trouble? Because the market for “just a photo” is saturated. The market for high-end cinematic experiences is wide open.
Imagine a movie studio launching the next big action franchise. Instead of a static poster, they can offer a QR code at the end of a trailer. The guest scans it, takes a selfie, and thirty seconds later, they’re the star of the trailer they just watched. This is the kind of “QR magic” that brands are willing to pay a premium for, and with Operator-Smart Analytics, you can prove it with clean numbers (capture rate, completion rate, shares, and delivery performance) instead of vibes.
Whether you’re pitching a corporate gala or a movie premiere, this workflow allows you to scale your growth by offering something truly unique. You aren’t just selling a photo booth; you’re selling a starring role.

Testing Without the Hardware
One of the biggest time-wasters in our industry is the physical setup. You shouldn’t have to drag your booth into your living room at midnight—or do the classic 11 PM run to the car—to grab hardware just to see if a transition works.
Pictor’s Live Simulator lets you test your entire flow (surveys, tokens, AI renders, and transitions) directly in your browser. You can simulate the guest experience in real time as you build, tighten the timing, and validate the full “Born Impossible” loop before you ever touch your event kit. This “shaves seconds off that turn into hours,” allowing you to iterate faster and go to bed earlier.
This is also where you can pressure-test KPI-driven flows. Pro operators don’t all optimize for the same thing:
- Email-first when the client cares about lead gen and list growth.
- Photo-first when the client cares about speed, smiles, and a frictionless guest experience.
Pictor’s flow stages are built for that reality. You can swap the order based on what the client actually values, without rebuilding your entire experience from scratch.
FAQs: Building AI Movie Trailers with Pictor
How long does it take to build an AI movie trailer in Pictor?
The entire “Born Impossible” workflow—from ideation to a polished 15-second trailer—was completed in under an hour with a live audience. Once your template is built, each guest’s personalized trailer renders in seconds.
Do I need video editing experience to use the template editor?
No. Pictor’s WYSIWYG template editor lets you drag and drop clips, set blend modes, and preview your timeline in real time. No video editing software required.
What are blend modes and why do they matter for photo booth trailers?
Blend modes (like Lighten) control how overlapping video layers interact. They let you create cinematic transitions—such as camera flash wipes and light leaks—without any masking or keying. Pictor is the only photo booth software that includes Photoshop-style blend modes directly in the editor.
Can I test my AI trailer without physical booth hardware?
Yes. Pictor’s Live Simulator lets you preview your entire guest flow—surveys, AI renders, tokens, transitions, and timing—directly in your browser before you ever set up hardware at an event.
How does Pictor handle guest likeness in AI-generated video?
Pictor’s GroupSense™ AI is designed to preserve real guest features, even in group shots and challenging live-event lighting. For best results, keep prompts focused on a single continuous shot and use the “selfie of myself” phrasing trick to anchor the model on the provided face.

The One-Hour Challenge
The “Born Impossible” workflow isn’t just about spies and explosions. It’s a blueprint for any brand story you want to tell. Whether it’s a 1920s jazz club, a futuristic space station, or a vintage baseball card, the steps remain the same: ideate with AI, separate your A-roll and B-roll, use tokens for personalization, and polish with blend modes.
The next time a client asks for something “revolutionary,” don’t panic. Open Pictor, fire up your “second brain,” and build a blockbuster. You’ve got an hour. Go.
Because this “Show & Tell” isn’t just a demo—it’s a peek into the second brain of modern event technology: the shortcuts, the creative patterns, and the operator-grade decisions that turn a selfie into something people line up to share.
And we don’t treat these sessions like one-and-done content. Most webinar ships with a recap, a blog post, and a community discussion so operators can compare notes, share templates, and build on what worked.
Want to build “Born Impossible” style templates yourself? Jump into a free trial and start experimenting with the flow, the prompts, and the blend-mode transitions—without waiting for your next event to test it. Check out our pricing or dive deeper into our features to see how Pictor can elevate your next activation.
Nicholas Rhodes
Founder of Pictor & OutSnapped
Nicholas is the founder of Pictor and OutSnapped. When he's not building the tools photo booth operators use daily, he's creative directing AI activations for experiential marketing events.
This entire Born Impossible workflow was built live during a Pictor Show & Tell session — from concept to cinematic trailer in under an hour.